Tools of the Trade

Day Eleven: Marking Pens (et al)

A few years ago, I spent each day in January writing about a different tool I use in my maskmaking. As I am currently redesigning my entire website in the new year, I thought it might be nice to revisit this project.  Each day in January 2021, I’ll share a different item that I use in my studio. I hope some of these can help other people who are interested in making wrestling masks. 

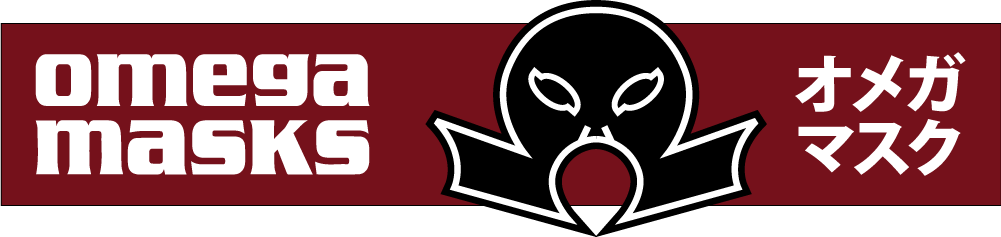
Anybody who has bought pens for marking on fabric know that they’re not all made equal. A lot of them are pretty horrible, to be honest. There are air-erasable pens and water-erasable pens and pens whose marks disappear when you iron them. Most of them are really iffy except on certain fabrics. When you’re working with things like spandex, vinyl, and leather, you usually need to search a little harder. Here are a few of the marking devices that I use most.

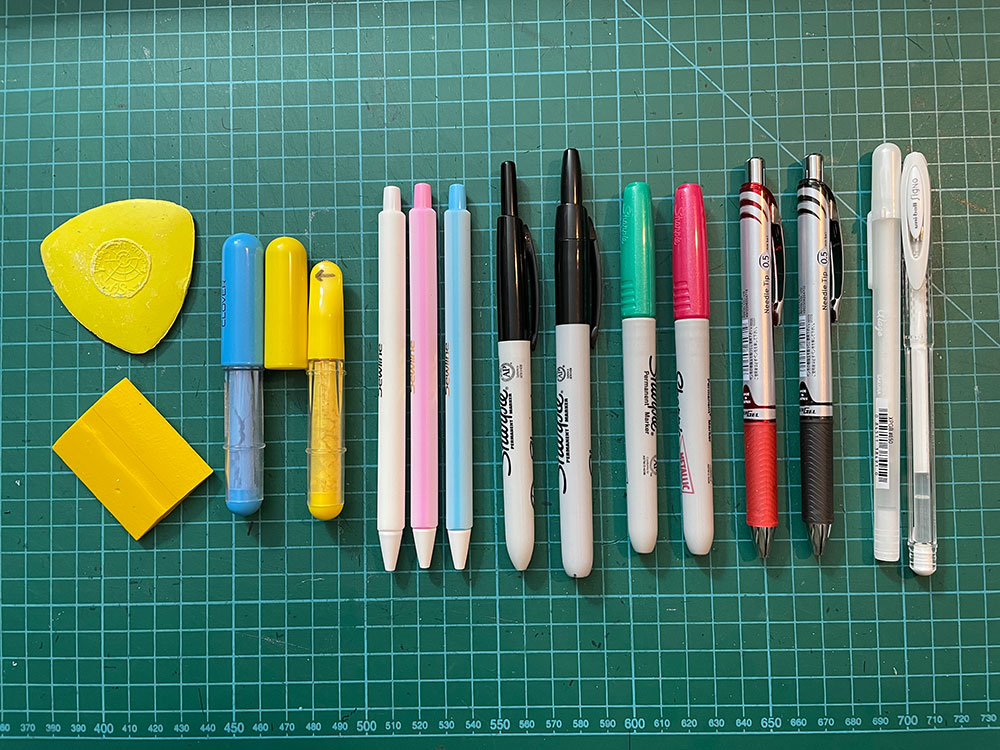
We’ll go through these left to right, top down. That first item is just a standard tailor’s chalk. Underneath is a tailor’s wax crayon. Both of these are great for quick outlining. They transfer their marks quite easily, so they can work nicely on stretchy fabric like spandex. The blue and yellow sticks next to them are Clover Chaco Liners. They’re full of a fine chalk powder, and a tiny grooved wheel in the tip lays down a thin line of chalk as you run it across the fabric. These are great because you’re not dragging a tip along a stretchy fabric; it rolls along it, so you can get a more precise line. I drew a little arrow on the tip to remind me which direction it should travel. It comes in a number of colours. Next are white, pink, and blue versions of the Sewline Click Chalk Pencil. They’re basically what they sound like, thin clickable pencils but with chalk instead of lead. (By the way, the price at that link is ridiculous; you should be able to find them much cheaper than that!)

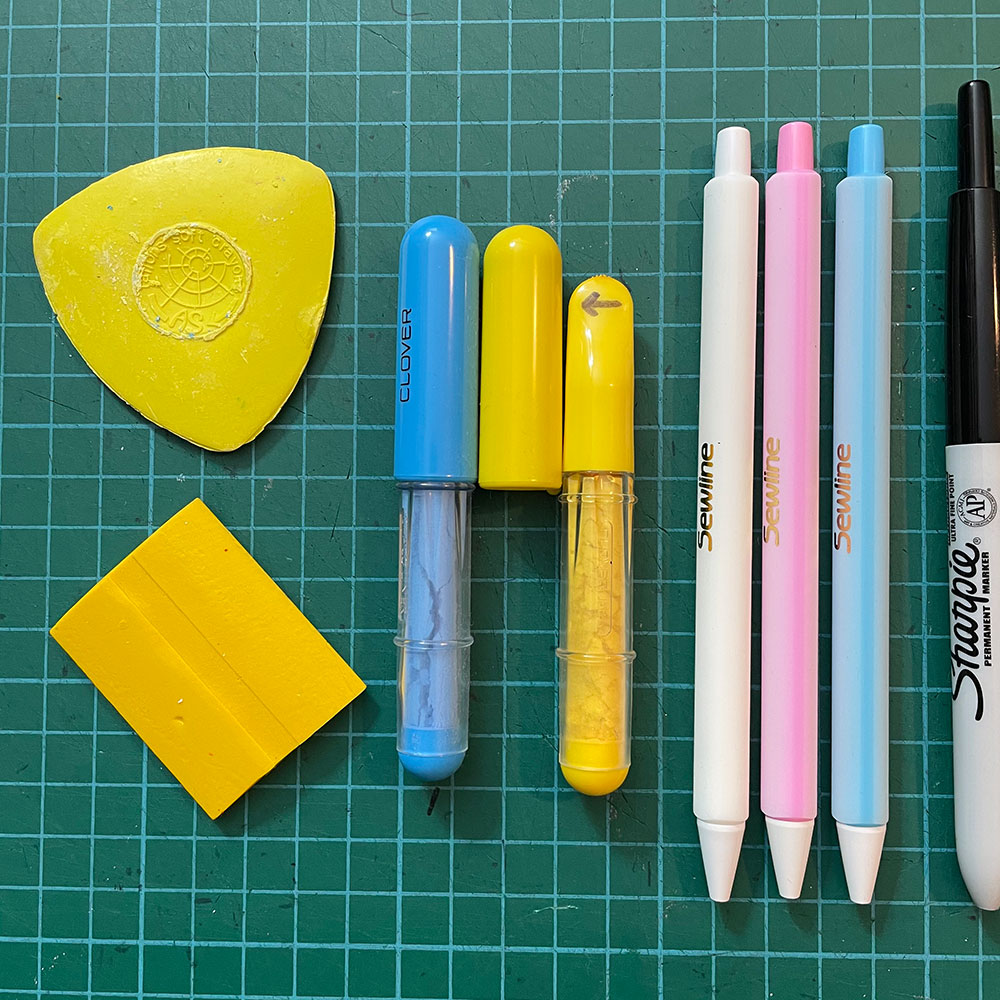
First in this picture are two clickable Sharpies, in Fine and Ultrafine. These are what I use most when tracing patterns onto fabric. I like the clickable ones because I can just quickly grab them, do what I need to do, and toss them back in the jar. After those are a set of red and green metallic Sharpies I bought a couple of years ago in the sales after Christmas. They seem to mark really well on dark fabrics, even a lot of the ones that normal light pens balk at. Next is a red and a black version of the 0.5 Needle Tip EnerGel Pen from Pentel. I just started using these recently. The tips are really thin, and they lay down a good line, so I’ve been using them on the back of vinyl when I need to trace off a pattern or make notes. Finally, I’ve always been looking for something that would make a good mark on dark vinyl. It’s a tricky medium. I’ve tried a bunch of things, and one day I went on JetPens and ordered one of just about every white pen they had. These are the two I liked the best. The first is the Sakura Glaze, and the next is the Uniball Signo. Both are gel pens, so they can sometimes be a bit finicky, but they’re the pens to go to on dark vinyl when you need a bit of precision and nothing else will work.

Tools of the Trade

Day Ten: Nävlinge Lamp

A few years ago, I spent each day in January writing about a different tool I use in my maskmaking. As I am currently redesigning my entire website in the new year, I thought it might be nice to revisit this project.  Each day in January 2021, I’ll share a different item that I use in my studio. I hope some of these can help other people who are interested in making wrestling masks. 

I like to have a lot of light when I’m working on a project. Like, a LOT of light. On my sewing machine alone, I have five lights, with a sixth that I can train on either my sewing machine or my cutting/gluing area. My favourite light is the Ikea Nävlinge LED Work Lamp. These things are inexpensive but super-useful. (Although the price seems to have gone up about 30% since I last bought them!) They consist of a nicely weighted base that keeps them where you want them on your desktop, a long and thin but sturdy gooseneck that allows you to get the light right where you want it, and a very bright directed LED light. The gooseneck is very flexible and stays right where you put it, so you an just pour light onto the area under your needle, or bend it so it’s coming in from any angle.

I think I have five or six of these puppies. I just love them. I do a lot of pattern cutting at my computer, so I have one there, one on my cutting/gluing table, and another on my leather worktable. Since the gooseneck is magnetic, I also attach little notes to them with magnets. You can also get the lamp in a number of colours and configurations. For example, there’s a clip-on and a floor-based model. On my cutting/gluing table, I have the Nävlinge on one side, and the gorgeously retro Ikea Forså on the other side (except mine is a lovely mint colour.)

BONUS TOTT

Since I’m talking about lights, I figured I’d show you a selection of the other lights I use that I think some other folks might benefit from. First is this floor lamp. The overhead light in my sewing room doesn’t throw out nearly enough light to suit me, so for years I’ve been using one of those halogen torchieres that are apparently illegal or something now. (They throw out a lot of light, but also ridiculous amounts of heat and can explode.) I finally stumbled on something called a “corn bulb”, which is designed for use as an overhead light in a garage. So I bought this 80W LED Corn Light Bulb and stuck it in a cheapo $8 floor lamp from Walmart, and it’s wonderful. It’s an amazing 8000 lumens, and lights up the room nicely.

Lastly, I wanted to show you the other lights I have on my sewing machine. Clockwise from the top left we have 1) The Uberlight 1000TL is a bright LED sewing lamp that bolts into the table. The head swivels easily, so it’s easy to move it from pointing at the sewing area to my hands when I need to rip out seams. 2) this magnetic gooseneck LED lamp lives on the back of my machine and shines light on the material behind the needle. 3) This is another of my favourite lights. It’s an LED strip that attaches magnetically underneath the machine, right next to the needle arm. It lights up the sewing area really well. I got mine from Keystone Sewing. 4) Last is nice Ottlite floor lamp that shines a general light over the whole work area. I think I got it at a thrift shop, 

Here’s another lighting idea that I don’t use myself, but I thought other folks might find useful. They’re a set of LED lights embedded in an adhesive strip that you can put on the underside of the arm of your sewing machine. It looks as if they would do a great job of lighting up your work area. There’s a number of people selling different types on Amazon.

Tools of the Trade

Day Nine: Silicone Tools

A few years ago, I spent each day in January writing about a different tool I use in my maskmaking. As I am currently redesigning my entire website in the new year, I thought it might be nice to revisit this project.  Each day in January 2021, I’ll share a different item that I use in my studio. I hope some of these can help other people who are interested in making wrestling masks. 

Yesterday I shared a cast iron weight I use to keep things flat while I’m gluing them. Today I thought we’d look at some other products I use while gluing, all made of silicone. The first is a silicone baking mat. I lay this over my cutting mat whenever I’m gluing things. If any glue strays off the surface of what I’m gluing, it’s easily wiped up or peeled up from the nonstick mat. (The only trick here is to remember to remove it when you want to cut something. I’ve managed to absentmindedly slash up at least three of these things! Do not mistake your gluing mat for a cutting mat!)

I was at an office supply store and saw these silicone bookcovers in the clearance section, marked down to almost nothing. I guess nobody bought them at back to school time! (I certainly wouldn’t have; can you imagine how weird your books would feel wrapped in these?) I saw another use for them though. They’re basically just thin sheets of silicone, so I cut them into a variety of sizes, and use them occasionally when I’m gluing things. Sometimes I lay them on top of the glued item before putting the cast iron weight on them, to prevent sticking. Sometimes I use them as a sort of nonstick dropcloth to mask off an area I don’t want to get glue on. They can also be used to wrap around an area where I want to use clips or clothespins to hold something in place as the glue dries.

I found a similar product in Japan at the wonderful Daiso store. These are designed to be wrapped around the top of a can or bowl to serve as a temporary lid, a sort of reusable cling film. It came in several sizes, and I use the biggest one as a quick portable work area when I need to glue somewhere other than my work bench.

Here’s another item I got on clearance. Our local college student store had this Softie Grip Grass marked way down, so I grabbed a couple. The thick, flexible cylinders accept just about anything you want to jam in there. I keep it right next to my work area, and mostly keep smaller tubes of glue in there. It’s also convenient for a small ruler, tailor’s chalk, toothpicks, pens, etc, etc, etc.

Tools of the Trade

Day Eight: Big Iron Weight

A few years ago, I spent each day in January writing about a different tool I use in my maskmaking. As I am currently redesigning my entire website in the new year, I thought it might be nice to revisit this project.  Each day in January 2021, I’ll share a different item that I use in my studio. I hope some of these can help other people who are interested in making wrestling masks. 

When I’m gluing my plate stacks together (the layers of vinyl that make the applique designs on the mask), I like to make sure they lay flat so the glue can set nicely. I used to just use big books and whatnot, but then came up with the idea of using a heavy hamburger or steak press; it would be easy to move around and more convenient than a stack of books. I looked around, but everything I found had ridges on the bottom, to make those grill marks people like on their meat.

One night I was over at my friend Jason’s house, telling him how I was having such a hard time finding a flat-bottomed burger press. Without even taking a step, he just reached out to his stove and said “like this one.” YES PLEASE. I can’t find this round version online, but here’s a rectangular version of the Lodge Cast Iron Press with a flat bottom. It works wonderfully for my intended purpose.

Tools of the Trade

Day Seven: Glue Spreaders

A few years ago, I spent each day in January writing about a different tool I use in my maskmaking. As I am currently redesigning my entire website in the new year, I thought it might be nice to revisit this project.  Each day in January 2021, I’ll share a different item that I use in my studio. I hope some of these can help other people who are interested in making wrestling masks. 

“Professionally used in beauty salons, dispensing and mixing face cream conveniently, scooping the cream without finger,keep the cream jar clean, flat spatula design gives smoother feelings without nasty sharp.” Well, you can’t ask for a better description of this tool. These makeup spatulas are most definitely without nasty sharp. They do have a nice thin flexible edge on them, so I find them to be mighty useful as glue spreaders. They can be used several times before they get too gunked up, and sometimes you can peel the glue off and continue to use them. Either way, they’re mighty affordable so you can toss them when they’ve truly become too unwieldy.

The other tool I use is actually homemade. Sitting at Mister Cacao’s elbow, watching him make masks, I’ve seen him use everything to spread glue from cardboard scraps to the stirrer from his Starbucks cup, but what he uses the most is simply a piece of wire that he’s bent into a useful spreader with a twisted handle. I’ve adopted this method in my own #maskmaking, as it’s cheap, easy to make, easy to use, and as a bonus, if you pick the right gauge of wire, the tool doubles as a plug for your tube of glue! Brilliant!

I just went down to my local Home Depot, and found the aisle where you can buy wire by the foot. I got a lifetime supply for about forty cents.

Tools of the Trade

Day Six: Needle Storage

A few years ago, I spent each day in January writing about a different tool I use in my maskmaking. As I am currently redesigning my entire website in the new year, I thought it might be nice to revisit this project.  Each day in January 2021, I’ll share a different item that I use in my studio. I hope some of these can help other people who are interested in making wrestling masks. 

I try to buy a bunch of needles whenever they go on sale. I use a couple of different kinds of needles for different materials, as well as a few different sizes, so I can have a bunch of packs of needles on hand at any given time. I originally found these storage boxes at JoAnn’s, and they’re perfectly sized for the packaging that Groz-Beckert uses for their needles. (You can also fit Schmidt needles in there, but you need to angle them a bit.) This one is the Craft Mates Lockables 7 Compartment 3XL, but they come in a few other sizes as well. They’re also pretty good for beads, gems, grommets, or any other small items you need to store. The compartments lock, so you can toss the whole thing in a drawer and not really worry about the contents spilling all over the place.

While I’m on the subject of needle storage, I thought I’d share another little gimmick I came up with. I tend to use three types of needles frequently, but there are times where I may not be able to sew for a couple of days or more. Industrial needles aren’t colour-coded like some home machine needles are, so I had this problem where I would forget what type of needle I had in the machine. I came up with a simple solution to this problem: I got some wooden Scrabble tiles and glued a small neodymium magnet to the back of each one. Each tile represents a different type of needle: R for regular point, B for ballpoint, and L for leather. I put the tile for the needle I’m currently using on the front of my machine, so at a glance I know I have (in the picture) a regular point needle installed. The other tiles live on top of the machine, and their associated needles are attached to them by the magnets. This system has helped me so much!!!

Tools of the Trade

Day Five: Victorinox Sharpener

A few years ago, I spent each day in January writing about a different tool I use in my maskmaking. As I am currently redesigning my entire website in the new year, I thought it might be nice to revisit this project.  Each day in January 2021, I’ll share a different item that I use in my studio. I hope some of these can help other people who are interested in making wrestling masks. 

Yesterday I showed the Olfa Art Knife that I use to cut the material for my mask plates. Today, I thought it would be helpful to share a little trick I learned, and the tool you use to do the trick. It’s important to use sharp blades when you’re cutting your material. Dull blades take more effort to use, and may result in ragged and imprecise cuts, and potentially could end up with you cutting yourself as you try to force the dull blade through the material. I used to go through blades pretty quickly, but then I was watching a leatherworking tutorial video and saw somebody honing their Xacto blades with a Victorinox Pocket Sharpener. When you use a blade to cut material, the sharp edge gets slightly bent to one side or another, and this contributes to a dull blade. Now before each cutting session, I pull the blade of my Olfa through the crisscrossed stones in the tip of this sharpener. A few strokes pulls the edge of the blade back into alignment, and cutting is a lot easier. This tool helps me extend the life of my Olfa blades. Where before I might change the blades once an hour, I can now make a single blade last a week or more!

Bonus Tool of the Trade: when I decide a blade is finally not performing up to par, even with the honing process, I use this Olfa Blade Disposal Can to store the discarded blade. The can is a little smaller than a hockey puck, and has a little door in the side that slides to reveal a slot. You stick your used blades in there, where they’re trapped inside. I also put snap-off blades in there; you can actually use it to snap the blades off by just sliding the tip in there and pulling the knife down (the blade snaps off and falls into the can.) This is much better than my previous method, which was to just lie the discarded blade on the table next to me, where I would inevitably cut myself with it later.

Tools of the Trade

Day Four: Olfa Art Knife

A few years ago, I spent each day in January writing about a different tool I use in my maskmaking. As I am currently redesigning my entire website in the new year, I thought it might be nice to revisit this project.  Each day in January 2021, I’ll share a different item that I use in my studio. I hope some of these can help other people who are interested in making wrestling masks. 

So while I do most of my fabric cutting with Kai Professional Shears, and do most of my parts trimming with Olfa SCS-1s, when I’m cutting vinyl or leather for the various plates ion my masks, I almost always use an Olfa Art Knife. More specifically, I use a special handmade version that I bought a couple of years ago at Design Festa, a big arts and crafts show in Tokyo. A wood turner I met makes these awesome handles, inside of which is a standard Olfa Art knife. I find that the chunkier handle is much easier on my hand when I’m cutting vinyl for an hour or more. This is one of my favourite tools I own.

The Japanese made Olfa blades are top of the line. The 45 degree angle is excellent for cutting. (A lot of folks use the standard Xacto #11 blades that are commonly found most anywhere, but I find the metal that Xacto uses to be too brittle, and I’m constantly breaking the tips off those blades. I do use them when I’m just cutting paper, since I don’t have to bear down nearly as much as when I’m cutting vinyl and leather.) Olfa blades are durable and sharp; they just slide through vinyl like butter. I also like how they come in a handy little plastic case that keeps them safe while sitting next to my tool jar. Plus, there’s an empty section of the box, and when you open the top, there’s a little slit that aligns with the empty compartment. This means you can use the same box as a container for blades that have gone dull, keeping your fingers safe and allowing you to easily dispose of the blades when the box is full.

There are a few other knives I use regularly. First is the VViViD retractable, which uses a 30 degree snap-off blade. The handle is very comfortable. I use this knife when I’m cutting very small details and need to make lots of sharp turns.

Next is another Olfa knife, one with a snap-off 9mm blade. (I can’t find this exact knife online, but this one is similar.) Nice slim and sharp blade, I keep this one next to my cutting table and use it to make rough cuts in my vinyl, separating the parts I traced patterns on from the larger body of material.

Last is a cheapo snap-off knife, probably from Harbor Freight. I use this to quickly cut down pattern paper.

I always like to try out new knives, so I have a bunch laying around that get varied levels of use. 

The top one is a standard metal Olfa art knife, which is what I used until I got that wooden grip version.

Next is a Fiskars SoftGrip Craft Knife, which accepts standard Xacto blades. The grip on this one is very comfortable.

The green knife is an Excel Blades Fitgrip Knife, which also takes Xacto blades and has a nice grip on it. It’s inexpensive and comes in several colours. I keep this one next to my computer, which is where I frequently cut my patterns (for some odd reason.)

Lastly is the Xacto Craft Tools #1 Knife, which has a nice ergonomic grip. (But I find myself reaching for the Excel Fitgrip more often!) This knife also comes in a variant that has a swivel blade, but I’ve never gotten the hang of it.


Finally we have these Fiskars knives with a more radical form factor. All of these slip over your index finger, allowing you to naturally grip the shaft right above the blade. These are, top to bottom, a standard #11 blade, a swivel blade (again, I don’t really know how to use these effectively), and a rotary cutter (which I can’t find a link for). Jade Masks frequently uses the top one, or a similar equivalent.

Tools of the Trade

Day Three: Kai Professional Shears

A few years ago, I spent each day in January writing about a different tool I use in my maskmaking. As I am currently redesigning my entire website in the new year, I thought it might be nice to revisit this project.  Each day in January 2021, I’ll share a different item that I use in my studio. I hope some of these can help other people who are interested in making wrestling masks. 

I do most of my fabric cutting with Kai Professional Shears. They’re high-quality Japanese made scissors that aren’t heavy and feel really good in my hand. Plus, the blades just slide through spandex. The angled handles make it really convenient for cutting fabric on a tabletop. I have the 7205, which has about a 9 cm blade, and the 7250SL with a 12 cm blade. The “SL” indicates that this  is the slim version, so a lighter weight pair of shears.

Tools of the Trade

Day Two: Olfa Scissors

A few years ago, I spent each day in January writing about a different tool I use in my maskmaking. As I am currently redesigning my entire website in the new year, I thought it might be nice to revisit this project.  Each day in January 2021, I’ll share a different item that I use in my studio. I hope some of these can help other people who are interested in making wrestling masks. 

Olfa Scissors

When I was studying with Mister Cacao in Japan, he used the Olfa SCS-1 scissors for EVERYTHING. They have a microserration in the blades that helps the scissors bite into the fabric and cut it cleanly. They’re simply wonderful! I keep a pair right next to my sewing machine and use them to trim fabric and vinyl. I also have a larger pair (the SCS-2) which I use for bigger jobs. They cut vinyl a lot better than most other scissors I’ve tried.

The one drawback is that you can’t really sharpen them due to the microserration, so I keep surplus pairs on hand to use as my main pair dulls. (But even once they’re past their prime, they make wonderful utility scissors, so I never throw them away!)